GrafEq - The View Window
GrafEq logo
Macintosh Manual

Chapter 5. The View Window


The view window is for displaying, and investigating, graphs of relations. GrafEq produces graphs using an iterative process: a rough approximation to the graph is first presented, which is then refined over time. Eventually, a correctly plotted graph of all active relations will be displayed. For more information about the plotting process, see the How GrafEq Works chapter.

A view window can be created by pressing the Create button of either the create view dialog box or the view option dialog box.
Hint:The create view dialog box appears automatically if a relation specification is completed by pressing the return key and the current graph does not have any open views. The dialog box can also be brought up by selecting New View from the Graph menu; additional views can be opened this way.

The view options dialog box is accessed from the create view dialog box, by clicking on the Create button while holding down the option key.

Figure 5.1 shows a view window displaying a graph with one active relation, y=sinx:
Hint:Initial settings are adopted from both the create view and the view option dialog boxes.

A view window displaying a graph with one active relation, y=sinx
Figure 5.1: A view window displaying a graph with one active relation, y=sinx

The view window consists of the following elements:


The elements of the view window are explained as follows:

Title bar
The title bar displays the graph title and the view title. The view title can be changed using the parameter bar’s title edit box. Figure 5.2 shows the title bar:

The title bar of a view window
Figure 5.2: The title bar of a view window

Parameter bar
The parameter bar is for customizing the view title, showing graphing status, controlling graphing activity, and displaying the percentage of the graphing area that has been proven to be correct. Figure 5.3 shows the parameter bar:

The parameter bar of a view window
Figure 5.3: The parameter bar of a view window

The elements, from left to right, are explained as follows:

Title edit box
The title edit box is for changing the view’s title. Custom titles are useful in demonstrations and for print-outs. The default title, “View #1”, is easily changed: click on the title edit box to start editing. The new title will replace the old one in all menus, windows, and buttons that show the view’s title.

Graphing barber pole
The graphing barber pole relays graphing activity. It revolves while the graph is being plotted. It is replaced with a blank bar if graphing is stopped, but not completed. It disappears when graphing has been completed: an absent bar means that the displayed graph has been proven to be correct in every detail.

Graph (...) checkbox
The Graph (...) checkbox lets you pause, and resume, graphing. Graphing occurs when the checkbox is selected: clicking on the checkbox toggles between the selected and unselected states.

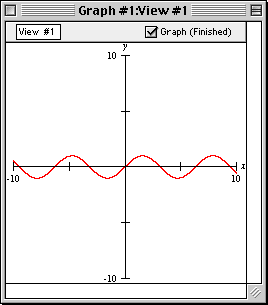
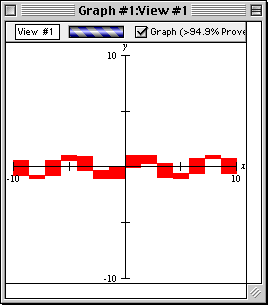
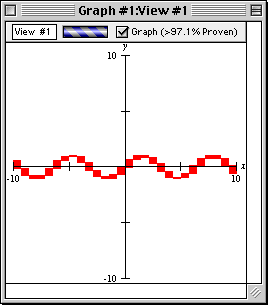
A progress report is shown in brackets; explanations of the common progress reports follow.

  • “Waiting” means that graphing has not started.
  • “>p% Proven”, with a single relation, means that more than p percent of the displayed pixels have been proven to be correctly coloured. With multiple relations, the average of the amounts proven for each relation is under-reported. For example, with two relations, one finished and the other just begun, the progress report would be “>49.9% Proven”.
  • “Finished” means that graphing has completed.
The following explains the reports that are shown when graphing cannot continue.
  • “Memory Stall” means that there is not enough available memory for graphing to continue. Increasing the amount of memory available to GrafEq may help.
  • “Subdivisions Exhausted” means that even though the remaining (uncertain) pixels have been divided into the finest mesh GrafEq can use, no more proofs were forthcoming. Changing the syntactic form of the relation or zooming into the region of interest may help.
  • “Precision Exhausted” means that GrafEq’s underlying number system does not have enough precision for graphing to progress. A correct graph of the desired area may be possible by introducing scaling and/or translation transformations into the relation.
Hint:If the Graph checkbox is deselected after graphing has finished, no change will occur.

View region
The view region is the main part of the view window: it displays the current view of the graph. Figure 5.4 shows a sequence of view windows displaying progressive stages of graph plotting, finishing with the completed plot.

GrafEq view window - view region before graphing starts GrafEq view window - view region when graphing just starts
GrafEq view window - view region when graphing a while GrafEq view window - view region when graphing is finished

Figure 5.4: Progressive stages of graph plotting

Hint:Ticked axes are applied to the view according to the current preference settings. They can be customized across sessions by modifying the preference settings, which are accessed by selecting Preferences under the File menu. The ticked axes can be turned off, for the current view window only, by deselecting Ticks in the colour view buddy. More controls over the ticked axes are available in the ticks view buddy. The ticks view buddy has many controls besides those for turning ticks on and off. Refer to the View Buddy Floating Window chapter for details.

Following is a summary of the controls of, and the various attributes of, the view window and its view region:

Conclusion

To conclude this chapter of the manual, following are some additional hints and tips about the view window:

Navigation Options
jump up to theTable of Contents

go back to The Create View and View Options Dialog Boxes
review The View Window
continue on to The View Buddy Floating Windows
send us email